The "Link" button
The "Link" button allows you to create new and edit existing hyperlinks. This button is located in the "Special Tools" area of the OE toolbar. The following screenshot shows this button.

The "Link" button
When generating XHTML code, the system will use the "a" tag for hyperlinks. This behavior is dictated by the "/design/standard/templates/content/datatype/view/ezxmltags/link.tpl" template.
Creating a hyperlink
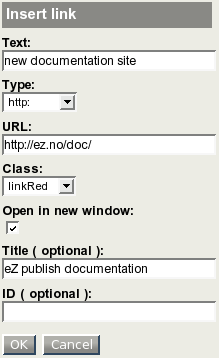
- Position the cursor at a location where you wish to add a hyperlink and click the "Link" button. Please note that you can also right click and select the "Insert link" item from the context menu. You will see a modal dialog called "Insert link" with the link properties (Text, Type, URL, Class, Open in new window, Title, and ID). The following screenshot shows this dialog. The different properties are described below.
Text
This parameter is required, you need to use it in order to provide a text for the link itself.
Type
There are five common types for external links (http:, mailto:, file:, ftp:, and https:) and two special types for internal links (ezobject:, eznode:). The internal links make it possible to create links to objects and nodes that are in the system. After choosing a link type, the type will appear in the URL field (for example "http://"). If you have chosen "ezobject:" or "eznode:", a button labelled "Browse" will appear above the URL field.
Clicking the "Browse" button will open a modal dialog that will allow the selection of objects which already exist in the system. It is very similar to the "Choose objects" window described in the subsection " Adding a related object to the list" except that it does not allow the selection of multiple items. Select the necessary object and click the "OK" button. The address will appear in the URL field, for example, "eznode://114".
Please note that the type dropdown is optional, you do not need to use it, you can type in the link address directly into the URL field.
URL
You have to specify a valid external or internal URL address (this is a required parameter). Javascript is not allowed here for security reasons.
Class
You can specify a CSS class that should be used when the link is rendered. For example, a custom class can be used to display the link using a specific color.
Open in new window
By default, the linked page will be opened in the current browser window / tab. You can check this box in order to have the link be opened in a new browser window / tab.
Title
You can specify a short title text. It will appear as a tooltip when the mouse pointer is hovering above the link. The tooltips will be displayed on the site pages. Users of Mozilla based browsers will also be able to see the tooltips inside the OE text area.
ID
You can assign a unique identifier to a link (it will become the ID attribute in the resulting XHTML code).
Please note that you can also select some text and click the "Link" button. It is also possible to right click on the selected fragment and choose the "Insert link" item from the context menu (this is shown in the screenshot below).
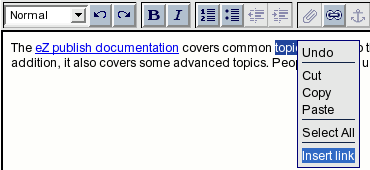
Online Editor: make a link from the selected text.
The dialog that was described above will appear and the "Text" field will contain the selected text fragment.
Classified links
To set the " class" parameter for a link, simply edit its properties - this is described in the next section.
Link properties
To edit a link's properties, position the cursor inside a linked text and click the "Link" button. You can also right click on the linked text and choose the "Link Properties" item from the context menu. When using Internet Explorer, the link will become selected when you right click it.
You will see a modal dialog called "Link properties". It is very similar to the "Insert link" window that was described in the previous section. Your changes will take effect after clicking the "OK" button.
Removing a hyperlink
To remove a link along with its text, simply delete the link text in the OE text area. If you want to keep the text but remove the link, right click the link and select the "Remove Link" item from the context menu. Users of Internet Explorer can also put the cursor at the end of the link and press the "Backspace" key.
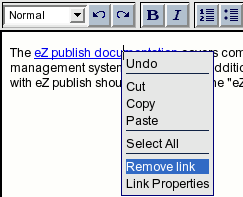
Online Editor: choosing the "Remove link" item from the context menu.
Objects as links
An embedded object can also be a hyperlink. In this case and if the object supports this feature, the link will be included in the resulting XHTML. For example, it is possible to link up image objects, manipulate and remove the link(s) - these features are explained in the following example.
Example
- Click on the embedded image object. It will become a selected element.
- Click the "Link" button.

Online Editor: an embedded object can be a hyperlink.
Please note that you can also right click on the image and choose the "Insert Link" item from the context menu. - The "Insert link" window will be displayed. The "Text" and "Class" properties will be inactive. Choose "http:" from the dropdown list so that the "http://" notation appears in the URL field. Add "www.ez.no" to this notation in order to make a valid link.
- Type in a tooltip text for example "Link to eZ Systems." in the "Title" field and click the "OK" button.
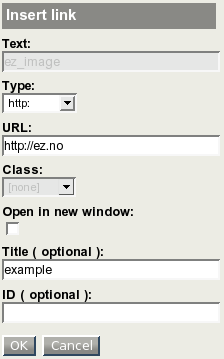
The "Insert link" dialog for embedded objects.
The image will become a link and it will be encapsulated by a blue frame.
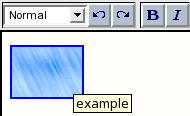
An image that is a link is encapsulated by a blue frame.
- Select the image by clicking on it and then click the "Link" button (or right click on the image and choose the "Link Properties" item from the context menu).
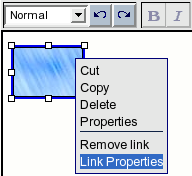
Online Editor: choosing the "Link Properties" item from the context menu.
- You will see a modal dialog called "Link properties". It is very similar to the "Insert link" window. This dialog allows you to edit the link properties. For example, you can use it to change the link URL to "http://ez.no/doc" and click the "OK" button to apply the changes.
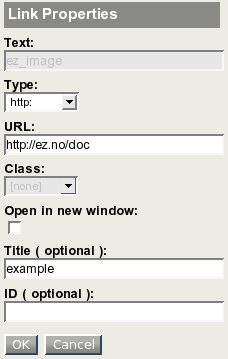
The "Link properties" dialog.
- To remove the link from the image, right click the image and select the "Remove Link" item from the context menu.
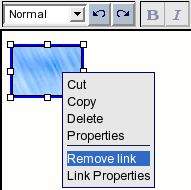
Online Editor: choosing the "Remove link" item from the context menu.
Svitlana Shatokhina (20/12/2005 12:21 pm)
Svitlana Shatokhina (11/05/2007 9:02 am)

Comments